 Save
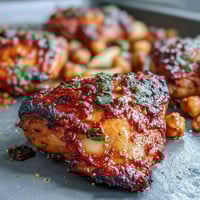
Save My sister called me in a panic on game day—she'd committed to bringing appetizers but had zero time to cook. I remembered these Asiago panko chicken bites from a Tuesday night when I was stuck at home craving something crispy and indulgent but didn't want to turn on the stovetop. Twenty minutes later, I was pulling golden, cheese-crusted bites from the oven, and she's been asking for the recipe ever since. Now they're her secret weapon at every gathering, and honestly, mine too.
I made these once for a quiet Friday evening with friends who were stressed about work, and something shifted when everyone reached for a second handful. My friend Sarah didn't say much, but she closed her eyes when she bit into one, and that small moment reminded me that food doesn't have to be complicated to feel like comfort. Sometimes the most memorable meals are the unplanned ones.
Ingredients
- Chicken breasts or thighs (500 g / 1 lb), cut into 1-inch pieces: Thighs stay juicier if you're nervous about dry chicken, but breasts work beautifully if you don't overcook them—cut them all the same size so they bake evenly.
- Salt and black pepper: Season the chicken first so the seasoning reaches inside, not just the coating.
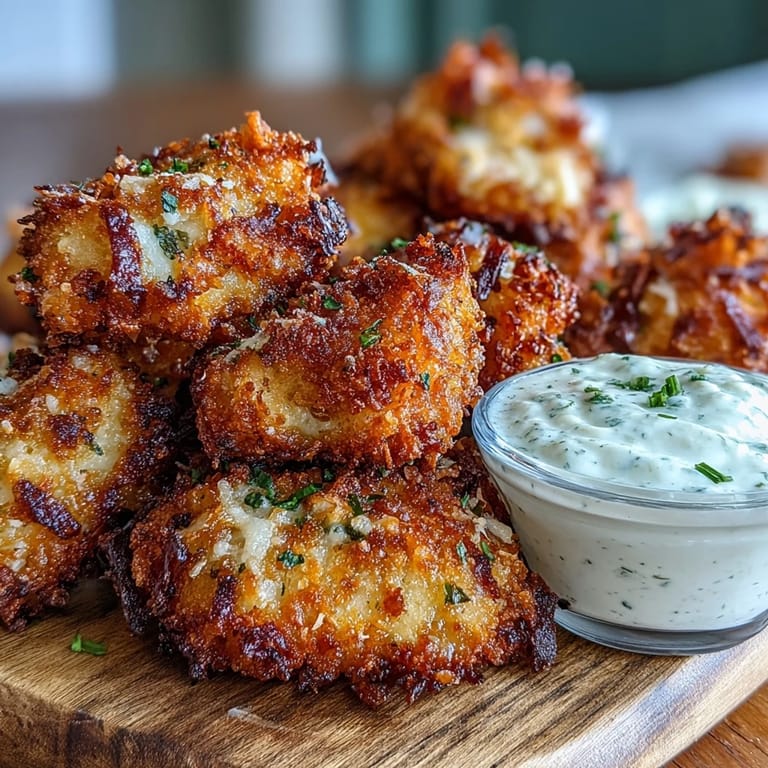
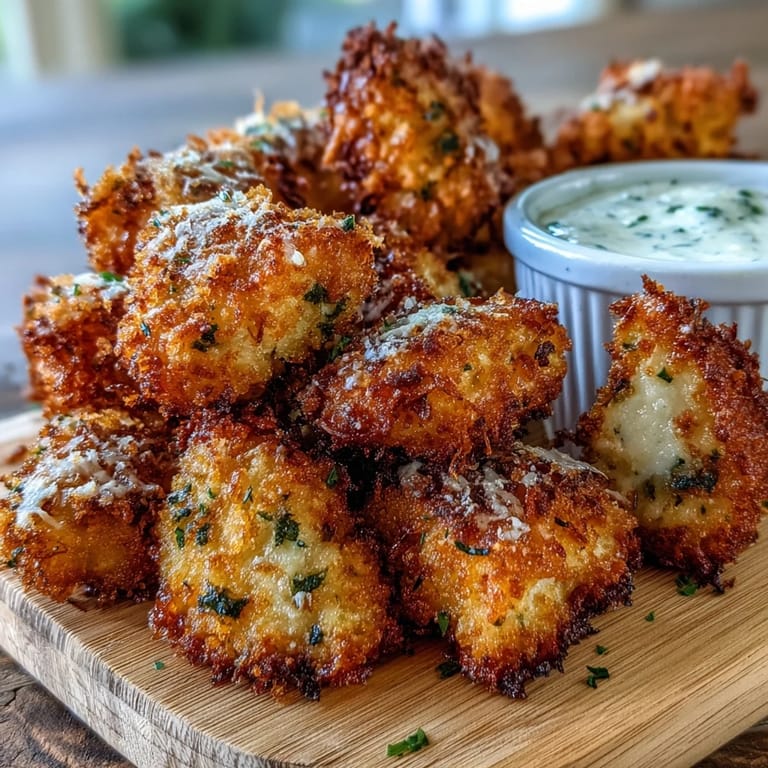
- Panko breadcrumbs (100 g / 1 cup): Panko's larger flakes are the secret to that shatteringly crispy texture that holds up through transport or sitting.
- Asiago cheese (60 g / 2/3 cup), finely grated: Grate it fresh if you can—pre-shredded cheese won't coat as evenly and the flavor gets duller from the anti-caking powder.
- Dried Italian herbs and garlic powder: These aren't optional flavor-wise, but you can skip them if your Asiago is sharp enough on its own.
- Eggs and milk (2 large eggs, 2 tbsp milk): The milk thins the egg so the coating sticks without pooling, which was the trick I learned after my first batch slid off mid-bake.
- Olive oil or melted butter (2 tbsp): This drizzle is the difference between crispy and dry—don't skip it even if you're watching fat intake, it really matters here.
Tired of Takeout? 🥡
Get 10 meals you can make faster than delivery arrives. Seriously.
One email. No spam. Unsubscribe anytime.
Instructions
- Heat your oven and prep your workspace:
- Get the oven to 220°C (425°F) and line a baking sheet with parchment—this prevents sticking and makes cleanup painless. Having everything ready before you start coating chicken means you won't be standing there with sticky fingers looking for a clean bowl.
- Season the chicken pieces:
- Toss your chicken chunks with salt and pepper, getting the seasoning on all the nooks and crannies. This step takes 30 seconds but changes everything about the final flavor.
- Set up your coating station:
- In one shallow bowl, whisk eggs with milk until smooth. In another, combine panko, grated Asiago, Italian herbs, and garlic powder, stirring well so the cheese doesn't clump up.
- Coat each piece thoroughly:
- Dip a chicken piece into the egg mixture, let excess drip off for a second, then press it into the panko-cheese mixture, turning to coat all sides—the pressing part is what makes it stick, not drowning it in egg. Work quickly or the breadcrumbs start getting soggy.
- Arrange on the baking sheet:
- Place coated pieces in a single layer without touching, which lets hot air circulate and keeps them from steaming instead of crisping. If they're crowded, they'll get soft and pale instead of golden.
- Add the oil that changes everything:
- Drizzle or spray each piece lightly with olive oil—this is what makes the coating actually brown and crunch. I learned this the hard way after eating sad, pale chicken bites my first time.
- Bake until golden and cooked through:
- Pop them in for 13–15 minutes, flipping halfway so both sides get golden. They're done when they're the color of honey and an instant-read thermometer says 74°C (165°F) inside.
- Optional but life-changing finishing touch:
- If you have a minute, run them under the broiler for 1–2 minutes to deepen that golden crust and add extra crispness that makes people ask for seconds.
 Save
Save There's something deeply satisfying about pulling a tray of these out of the oven and watching people's faces light up—it's simple enough that you don't stress, but impressive enough that it feels like you tried. That balance is hard to find in cooking.
When to Serve These
These shine as a game-day snack, a light lunch with greens, or the appetizer that gets people talking before dinner starts. I've also found they're perfect for meal prep—make a batch on Sunday and eat them cold straight from the fridge all week, which feels almost too easy.
Dipping Sauce Ideas That Actually Matter
The chicken is rich and savory, so you want something with brightness or creaminess to balance it. Marinara brings warmth, ranch is the comfort choice, honey mustard adds tang, and garlic aioli feels fancy without being complicated. My personal weakness is dipping them in a mix of sour cream and hot sauce—sounds weird, tastes incredible.
Make It Your Own
This recipe is a template, not a rule. The Asiago is the star, but you can swap it for sharp Parmesan, nutty Pecorino, or even crumbled aged cheddar if that's what's in your fridge. For gluten-free, use gluten-free panko and check the label to be sure. You could add a tiny pinch of cayenne if you like heat, or fresh lemon zest if you want brightness.
- Store leftovers in an airtight container in the fridge for up to three days—they reheat beautifully in a 180°C oven for five minutes.
- Freeze coated chicken pieces on the tray before baking, then bake straight from frozen, adding a minute or two to the cook time.
- This recipe doubles easily if you're cooking for a crowd, just watch that you don't overcrowd the pan.
 Save
Save These little bites have become my answer to the question, What can I make that's actually good and doesn't take forever? Make them once and you'll understand why they keep coming back to the table.
Recipe Help
- → What makes Asiago cheese ideal for coating chicken?
Asiago's sharp, nutty flavor melts slightly during baking while maintaining structure, creating pockets of concentrated savory taste throughout the crispy coating. Its granular texture when finely grated distributes evenly across each piece, ensuring consistent flavor in every bite.
- → Can I fry these instead of baking?
Absolutely. Heat 2 inches of oil to 350°F and fry for 3-4 minutes until golden brown. Drain on paper towels before serving. The baking method, however, reduces oil absorption and cleanup time while still delivering excellent crunch.
- → How do I store and reheat leftovers?
Store cooled bites in an airtight container for up to 4 days. Reheat at 400°F for 8-10 minutes until hot and crispy. Avoid microwaving as this creates soggy coating. For freezer storage, freeze uncooked pieces on a baking sheet first, then transfer to bags for up to 3 months.
- → What dipping sauces pair best?
Marinara sauce provides classic contrast, while ranch dressing offers cool creaminess against the savory coating. Honey mustard adds sweet tang, garlic aioli enhances the cheesy notes, and spicy arrabbiata sauce cuts through the richness for those who enjoy heat.
- → Why use panko instead of regular breadcrumbs?
Panko's larger, flaky structure creates airier, lighter coating that stays crispier longer than traditional breadcrumbs. The jagged edges also catch more surface area, resulting in superior crunch and better adhesion of the cheese coating.
- → Can I prepare these ahead of time?
Yes. Coat the chicken pieces and arrange on the prepared baking sheet, then refrigerate uncovered for up to 4 hours before baking. Let sit at room temperature for 15 minutes before baking to ensure even cooking. Do not freeze unbaked pieces without flash-freezing first.