Save
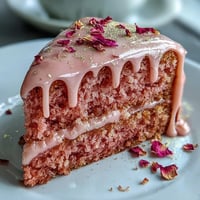
Save My first encounter with hojicha cake happened on a quiet Tuesday afternoon at a small tea shop in Kyoto, where the air smelled like toasted rice and something indefinably comforting. The slice was impossibly light, almost dissolving on my tongue with a gentle roasted tea flavor that wasn't bitter or sweet, just deeply satisfying. I spent the train ride home trying to reverse-engineer what I'd tasted, scribbling notes about texture and that particular warmth hojicha brings. Years later, I finally understood it wasn't just the tea—it was the technique, the respect for simplicity, the way Japanese bakers treat sponge cake like it's a precious, fragile thing. Now I make this whenever I want to feel that same quiet contentment in my own kitchen.
I baked this for my partner's birthday last spring, and I remember the exact moment they closed their eyes after the first bite and didn't say anything for what felt like forever. Then they just said, 'This tastes like somewhere I've never been but somehow remember,' which is exactly what hojicha does to people—it triggers something nostalgic in your brain even if you've never had it before. I've made it six times since then, each time learning something new about how the oven in my kitchen behaves, how humidity changes everything, what 'peaks' really means when you're whipping cream.
Ingredients
- Eggs (4 large, room temperature): Cold eggs won't incorporate air properly, and you need that trapped air for the ethereal texture—take them out at least an hour before starting.
- Granulated sugar (120 g): This isn't just sweetness; it's the structure and the mechanism that helps those eggs capture and hold air when you whip them.
- Cake flour (120 g, sifted): Use actual cake flour, not all-purpose—it has less gluten, which is why the crumb stays delicate instead of chewy.
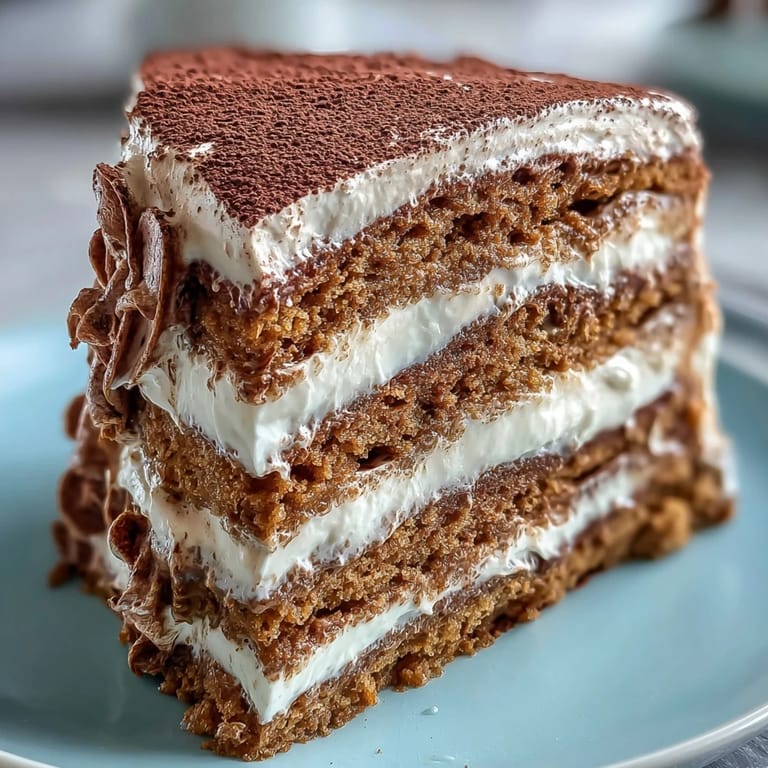
- Hojicha powder (20 g for cake, plus 10 g for cream): This is roasted green tea, milder than matcha, with an almost nutty undertone—find it at Japanese markets or online, and check it's pure powder with no added sweetener.
- Unsalted butter (40 g, melted and cooled): The butter needs to be liquid but not hot, or you'll cook the eggs; cooling it is crucial and easy to skip but don't.
- Whole milk (30 ml, room temperature): The butter and milk are your secret weapon for keeping the cake moist without making it dense—they temper each other.
- Fine sea salt (1/4 tsp): Even in desserts, salt wakes up flavor; it's what makes people wonder what that underlying depth is.
- Heavy cream (300 ml, minimum 35% fat): Don't buy the ultra-pasteurized stuff if you can help it; it whips less readily and tastes flatter.
- Powdered sugar (40 g): Sift it before adding to avoid lumps in your whipped cream, a small step that matters completely.
- Vanilla extract (1 tsp): This bridges the gap between hojicha and cream, adding a note of familiarity to something unusual.
Tired of Takeout? 🥡
Get 10 meals you can make faster than delivery arrives. Seriously.
One email. No spam. Unsubscribe anytime.
Instructions
- Prepare your pan and oven:
- Line the bottom of your 20 cm cake pan with parchment paper, but leave the sides completely ungreased—this allows the batter to climb the walls as it bakes, creating that signature tall, fluffy rise. Preheat your oven to 170°C, which is gentler than typical cake temperatures and gives you a forgiving window for perfectly cooked layers.
- Warm your eggs and sugar:
- Place eggs and granulated sugar in a heatproof bowl over simmering water, whisking constantly until the mixture reaches about 40°C—you're looking for it to feel warm to the touch, like body temperature. This warming step dissolves the sugar completely and helps the eggs whip to triple their volume.
- Whip until it's impossible to believe:
- Remove the bowl from heat and beat on high speed with an electric mixer until the mixture is thick, pale, and has increased dramatically in volume—this takes about 7 minutes and sounds like a lot until you see it happening. The batter should fall in thick ribbons from the whisk, and when you lift the beaters, it should hold peaks for a moment before folding back in.
- Fold in the dry ingredients:
- Sift together the cake flour, hojicha powder, and salt, then fold this mixture into your whipped eggs in two additions, using a rubber spatula and working gently from the bottom up. You're trying to keep every bit of that air you just worked so hard to trap, so think of folding as supporting the batter, not pushing it.
- The butter-milk trick:
- Combine your cooled melted butter and milk in a small bowl, then scoop some of the batter into this mixture and stir until it's all incorporated—this tempered mixture is now safe to fold back into the main batter without deflating it. This technique prevents cold butter from sinking and creating dense pockets in your cake.
- Pour and tap:
- Gently pour the batter into your prepared pan and give it a few gentle taps on the counter to release any large air bubbles hiding inside. You're aiming for even distribution without agitating the batter.
- Bake with patience:
- Slide into the oven and bake for 23 to 25 minutes—the top should spring back when you press it lightly with your finger, and a skewer inserted should come out completely clean. If you open the oven before 20 minutes, you risk deflating everything you've built.
- Cool strategically:
- Let the cake cool in the pan for exactly 10 minutes, then run a thin knife around the edges and invert it onto a cooling rack while the structure is still slightly warm—this prevents sticking. Leave it to cool completely, which might feel like forever but is non-negotiable for clean slicing later.
- Make the hojicha cream:
- In a chilled bowl, sift together the hojicha powder and powdered sugar so you don't end up with lumps in your whipped cream. Add the heavy cream and vanilla, then whip steadily to medium-stiff peaks—not rigid and grainy like overwhipped butter.
- Layer and chill:
- Slice your completely cooled sponge horizontally into two or three layers, spread hojicha whipped cream between each layer and over the top, then refrigerate for at least 30 minutes before serving. Cold cake slices cleanly and the flavors settle together beautifully.
 Save
Save There was a morning when I brought a slice of this cake to my neighbor, and she held up her hands and said she couldn't eat cake before noon, which I understood completely until she tasted it anyway and then just stood there quietly for a moment. That's when I realized this isn't a dessert in the traditional sense—it's something gentler, more introspective, almost meditative. It transformed her entire afternoon, and that's the real magic of this recipe.
The Science of Sponge Cake
Sponge cake relies entirely on air—whipped eggs create tiny bubbles that expand in the oven's heat, creating that impossibly light crumb. The moment you understand this, you stop treating sponge cake like a regular cake and start treating it like you're building something delicate from nothing. Every fold, every temperature, every decision matters because you're protecting those bubbles.
Why Hojicha Changes Everything
Hojicha is green tea that's been roasted until it's dark and fragrant, which removes the astringency and replaces it with something warm and almost cereal-like. It pairs beautifully with the pure, gentle flavor of sponge cake because neither ingredient overwhelms the other—they're having a conversation instead of a fight. The roasted notes also bridge the gap between tea and dessert in a way that feels completely natural and sophisticated.
Variations and Possibilities
Once you've made this cake once, you'll understand the structure well enough to experiment, and there are beautiful directions you can take it. I've brushed each layer with simple hojicha tea before adding cream for extra moisture and flavor depth, added crushed roasted nuts to the whipped cream for texture, and even swapped the vanilla for a tiny splash of honey for a different sweetness profile. The cake itself is your canvas—treat it gently and let your curiosity guide you.
- Brush layers with cooled hojicha tea or honey-sweetened simple syrup for a moister final result.
- Fold crushed roasted nuts or sesame seeds into the whipped cream for unexpected texture and earthiness.
- Dust the finished cake with extra hojicha powder or cocoa, or edge it with chocolate shavings for visual drama.
 Save
Save This cake asks you to slow down and pay attention, and that's exactly why it's worth making. When you pull it from the oven and it's risen perfectly, or when someone tastes it and their whole face softens, you'll understand why this recipe has lived in my kitchen and in my heart for years.
Recipe Help
- → What makes hojicha different from other Japanese teas?
Hojicha is roasted green tea leaves, creating lower caffeine content with warm, toasty, caramel-like notes. The roasting process gives it a reddish-brown color and mellow flavor that's perfect for baking.
- → Can I substitute hojicha powder with matcha?
While matcha will work, it will change the flavor profile significantly. Matcha is grassy and vibrant, while hojicha offers earthy, roasted notes. For the intended flavor, use hojicha powder from Japanese markets or specialty tea shops.
- → Why shouldn't I grease the cake pan sides?
Genoise sponge needs to climb the pan sides to rise properly. Greasing prevents this grip, resulting in a denser texture. Lining just the bottom with parchment allows the batter to rise evenly.
- → How do I know when the eggs are whipped enough?
The egg mixture should triple in volume, become pale yellow, and form thick ribbons when the whisk is lifted. This aeration is crucial for the sponge's fluffy texture.
- → Can I make this cake in advance?
Yes! The assembled cake actually improves after chilling for several hours or overnight. Store in the refrigerator, wrapped well, and bring to room temperature 20 minutes before serving.
- → Why brush layers with hojicha tea or syrup?
Lightly brushing the sponge layers adds moisture and intensifies the tea flavor. This simple step prevents dryness and creates a more luxurious mouthfeel.